To get started, first we will create a simple directory structure to store our projects.
Note
You are welcome to use your own structure or location for projects. Please be aware that you’ll need to modify the paths as they are encountered in each lab.
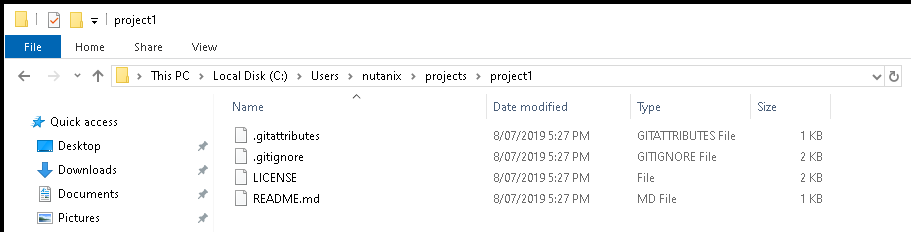
Option 1: Use Windows Explorer for this step - a suggested directory structure is shown below. Please note this structure has been created in the current user’s home directory. After creating the directory structure please continue to the next step - Languages.
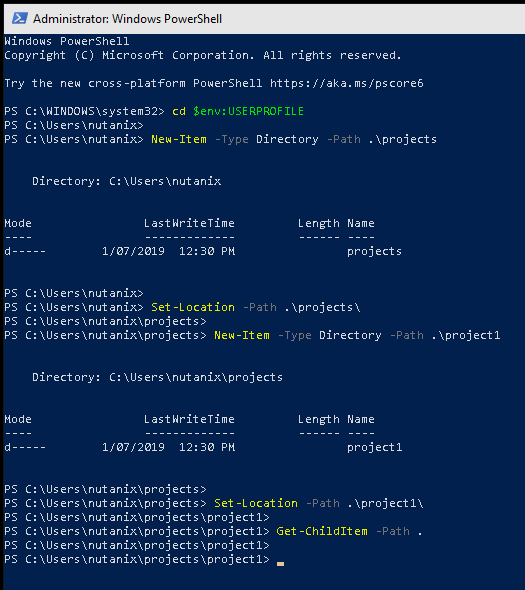
The screenshot below shows this process being run on Windows 10 as a user called nutanix.
Note
Some will have noticed the use of the cd command above. Windows PowerShell provides aliases for a variety of command prompt commmands. For example, the PowerShell commands above can be run in almost the exact same way in PowerShell as they would have been in the command prompt:
# change to your home directory# note PowerShell doesn't recognise %USERPROFILE%cd$env:USERPROFILE
md projects
cd projects
md project1
cd project1
dir
This lab, however, focuses on PowerShell-specific commands.
With this section complete you now have a simple but usable directory structure to hold your projects.
The next step will be to install specific language versions that are both recommended for overall development and required for the Developer Marketing labs.
The Python website has packaged Windows 10 binary installation media for Python 3.7. For this reason, the steps are very simple.
Download the 64-bit executable installer from the Python website
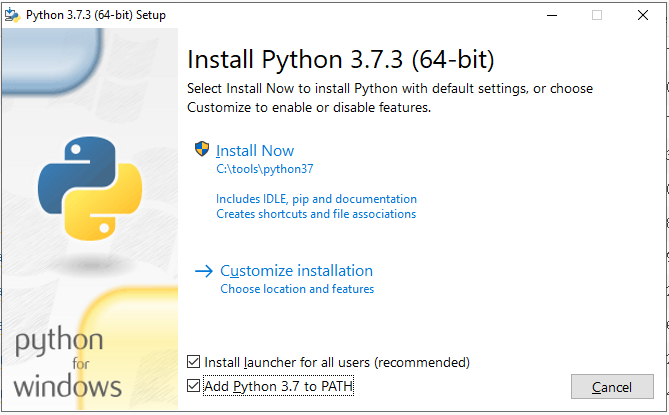
Run the installer and, before completing installation, read through the steps below!
Check the option labelled Add Python 3.7 to PATH
Select Customize installation
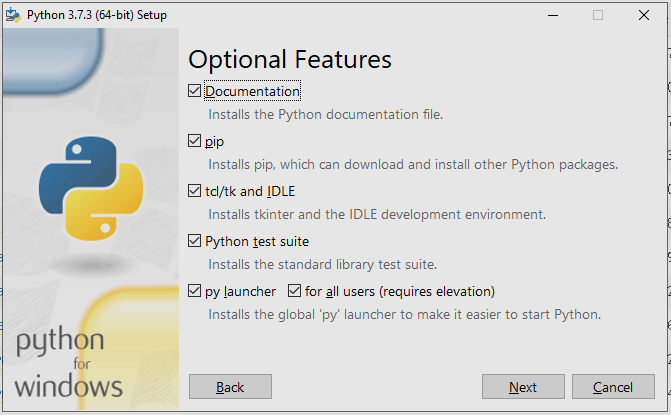
Leave the options as shown and click Next
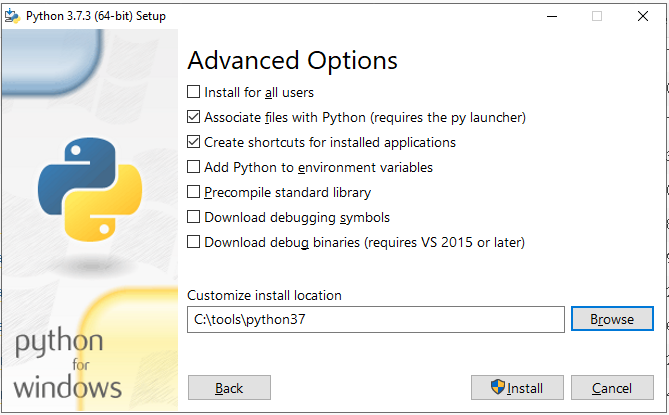
Before continuing, please note that the Nutanix Developer labs will assume Python has been installed into C:\tools\python37. Please change installation path, as shown below.
Let the installation complete, then open Windows PowerShell
Check the Python version and run the Python 3.7 REPL (read-eval-print loop) by running the following commands:
python--versionpython
The screenshot below shows the verification process, followed by starting the Python 3.7 REPL.
Note
When you have finished using the Python REPL (read-eval-print loop), the exit() statement can be used to exit to the terminal.
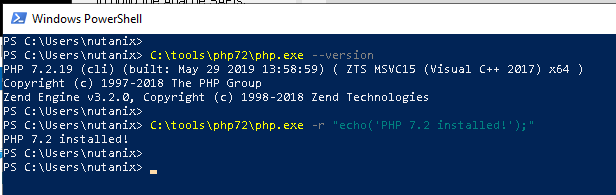
PHP 7.2 builds for Windows are provided as “Thread Safe” and “Non Thread Safe” versions. The reasons to use each version are beyond the scope of this lab, although high-level information can be found on the PHP for Windows download page.
A screenshot of this process is shown below. PHP 7.2 has been confirmed as installed and available, then a very simple echo statement run to ensure PHP code can be executed.
For the Nutanix Developer labs, PowerShell is specific to Windows only. We have already used PowerShell to complete various tasks, including:
Create our directory structure
Verify Python 3.7 availability
Verify PHP 7.2. availability
The single remaining step is to ensure we can run our own scripts in Windows PowerShell. First, let’s see why that needs to be done.
Start Notepad
Add the following code to the new document:
Write-Host"Does this message print?"
Save the file as <user_home_directory>\projects\script1.ps1, making sure to set Save as type to All Files within the Save As dialog
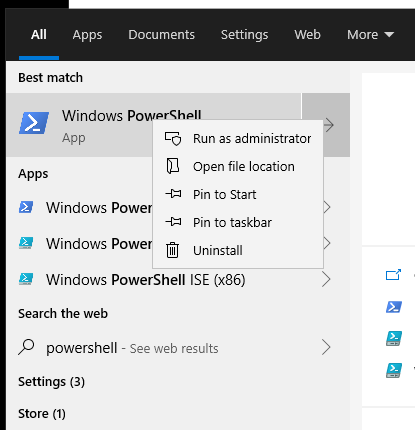
Start Windows PowerShell with administrator permissions. To do this, the Windows PowerShell Start Menu item can be right-clicked and “Run as Administrator” selected, as shown below:
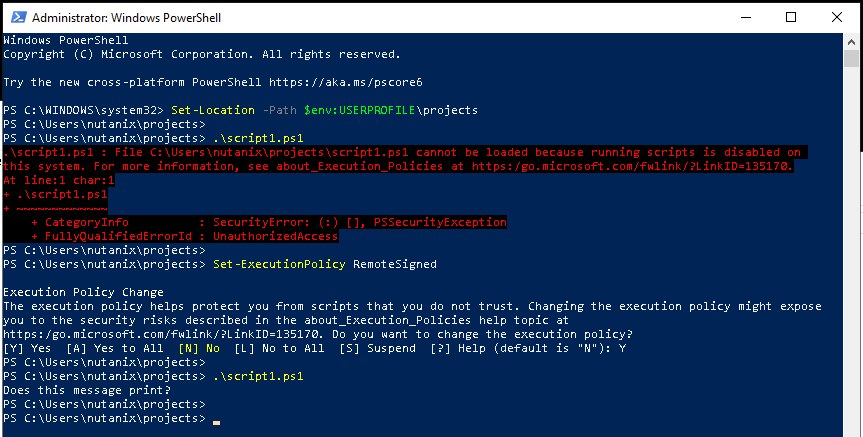
Enter the following commands to change to our projects directory, then run the new script:
On a system that hasn’t been configured yet, we are immediately shown an error that indicates the script does not have permission to run. If required, more information can be read by going to about_Execution_Policies.
We will fix this now, though.
Within the same PowerShell window, enter the following command and select Yes, when prompted:
Set-ExecutionPolicyRemoteSigned
Note
If this command is attempted without PowerShell running As Administrator, access will be denied.
Now that our script has permission to run, let’s run it again. Run the command below:
.\script1.ps1
If everything is configured, the script1.ps1 script will now run and our message shown as expected.
For those new to development, it is strongly recommended that you first read the Editors - Additional Information section. It includes important information about editor choice and built-in editors that should be understood, but is optional for the completion of this lab.
Before getting started, consider that having all the language frameworks installed is great, but at some point you’re going to want to write code.
The steps in this section cover the installation of three of the most common and popular editors. A later section in this lab will cover some optional but recommended language-specific customisations.
Please be aware that this section isn’t a how-to guide for installing the applications themselves; it is assumed that readers will be familiar with how to install applications.
When the installer has finished downloading, run the executable installer
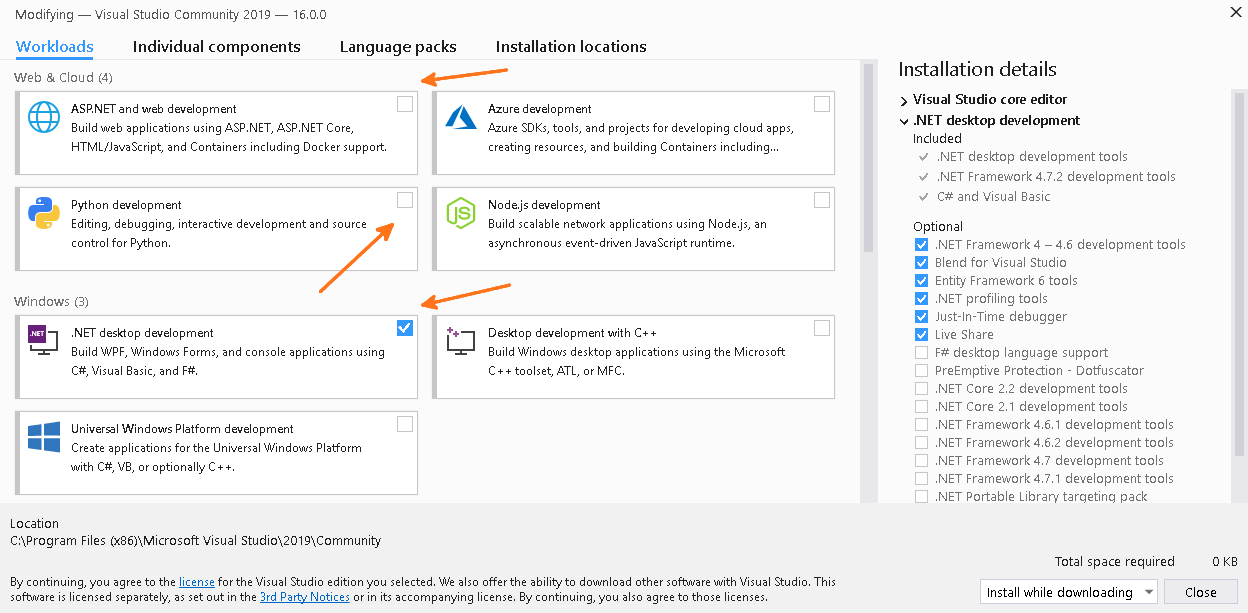
At the Workloads screen, ensure at least .NET desktop development is selected
If you would like to use Visual Studio Community for Python development instead of Visual Studio Code, ensure Python Development is selected
For web applications (as opposed to desktop applications), ensure the ASP.NET and web development component is installed
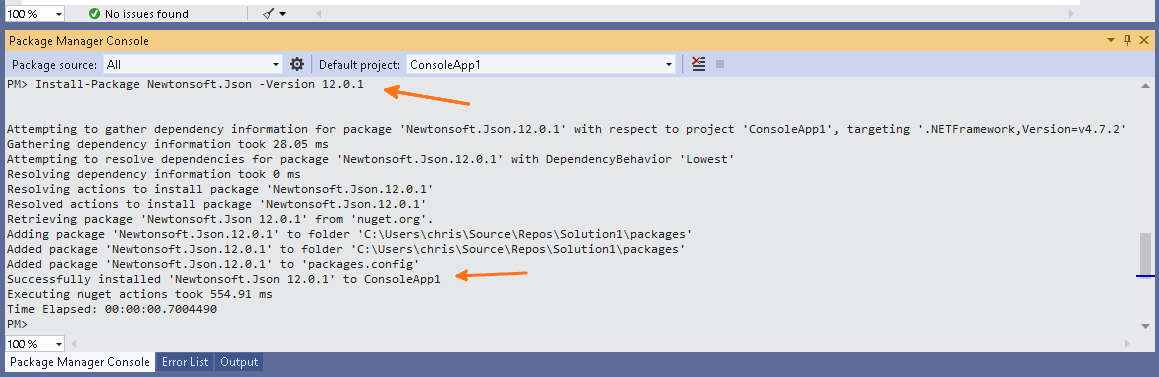
New C# applications that make API requests and process JSON can benefit from the use of Newtonsoft.Json, a package that allows the parsing of JSON responses. To install Newtonsoft.Json, follow the optional but recommended steps below.
Note
You will need to have a Visual Studio solution open before completing these steps. This is because packages such as Newtonsoft.Json as installed below are added as references; they are not global packages that apply to all solutions.
Select the View menu, select Other Windows and click Package Manager Console
Enter the following command into the Package Manager Console:
Install-PackageNewtonsoft.Json-Version12.0.1
The screenshot below shows a successful installation of Newtonsoft.Json into an existing project:
With this section complete and depending on your operating system, you can now use one of the below editors or IDEs to start writing code:
Sublime Text 3
Microsoft Visual Studio Code
Microsoft Visual Studio Community (if using Windows 10)
The next step will be to look at some optional but recommended tools that can make efficiency and best-practice improvements to your development workflow.
Here’s a quick summary of what we’ve accomplished so far.
Created a simple but usable directory structure to hold our projects i.e. projects directory within our user’s home directory
Ensured Python >= 3.6 and PHP >= 7.2 are installed
(Windows 10 only) Ensured PowerShell and C# are installed
Installed a suitable editor that is designed to write code, not “just” text (please remember to go through the Editors - Additional Information section, if you are new to development)
Note
Source control, while strongly recommended, is NOT required to complete Nutanix Developer labs.
One of the key parts of software development is making sure changes are tracked, version history is maintained and, as a bonus of sorts, backups are kept. However, please be aware that pushing source code to GitHub should not be considered a primary backup.
There are a number of software packages and services that provide these capabilities; in this lab we will concentrate on Git SVN and the related cloud service, GitHub.
Note
For those new to software development, the two points below can help understand the basic differences between Git and GitHub.
Git is a version control system that provides the management of software version history. For example, project1 could have two versions, each of which is tagged with a commit ID. This commit ID identifies the software that has been committed to the version control system (Git) and allows authorised people to clone from and update a specific version, while leaving other versions untouched. The commit history for a project is stored in a Git repository.
GitHub is a cloud-based SaaS (Software as a Service) product that allows software developers to store and manage their Git repositories. For example, a GitHub account named jane_doe could be the owner of the project1 repository; this repository is “pushed” to the GitHub cloud service at various intervals.
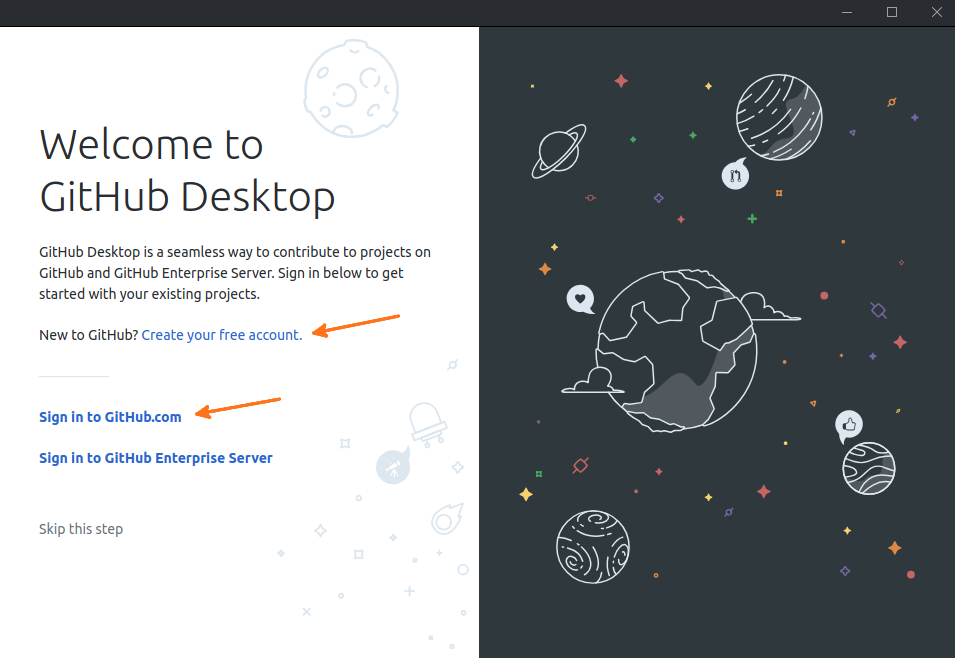
Windows has a graphical GitHub tool provided by the GitHub team. This is what we’ll use in this section.
Open the GitHub Desktop website and download the latest version for Windows
Install GitHub Desktop from the downloadeded .exe executable
Run GitHub Desktop and, if you don’t have an existing GitHub account, create one using the Create your free account option. This step isn’t 100% mandatory but is strongly recommended.
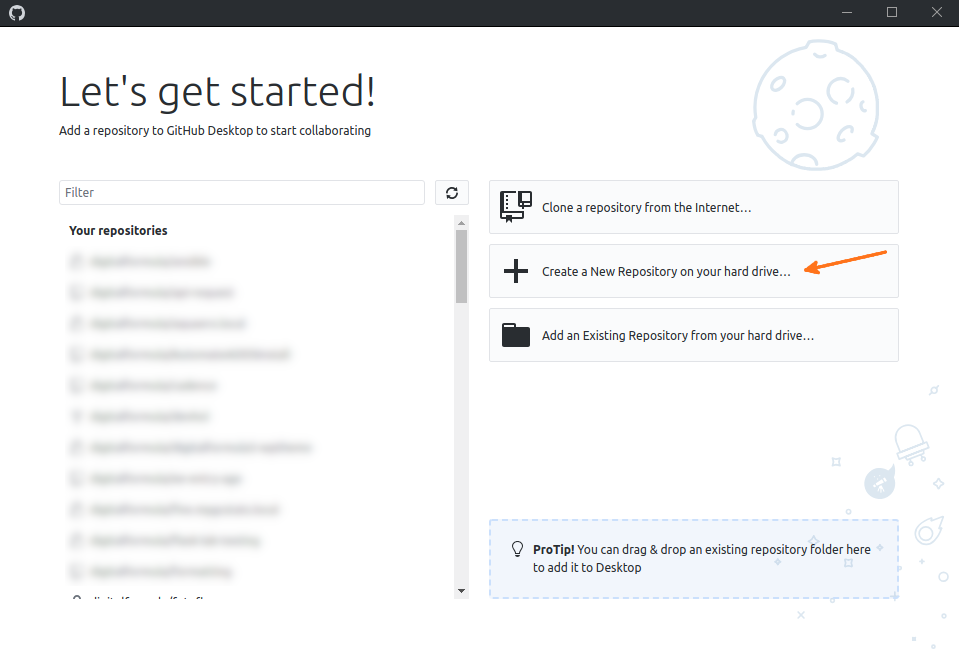
Continue below if you would like to create your first repository now
Select Create a New Repository on your hard drive…
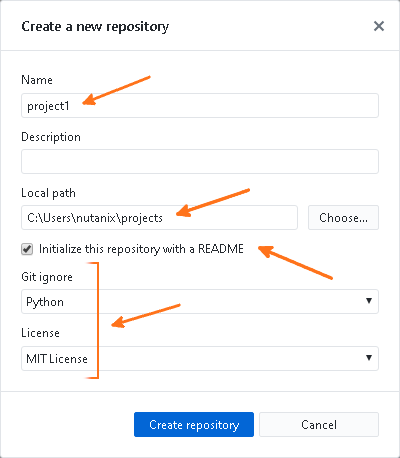
Enter a name for the repository e.g. project1, select a path and check the options as required.
Note
These screenshots assume you are using the directory structure created in the earlier “Project Structure” section of this lab.
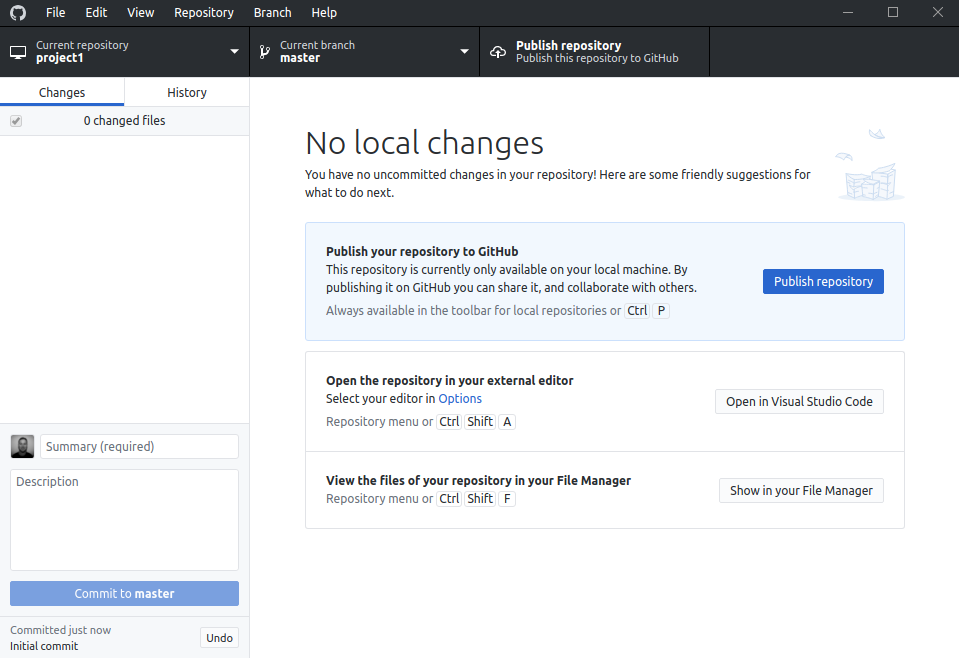
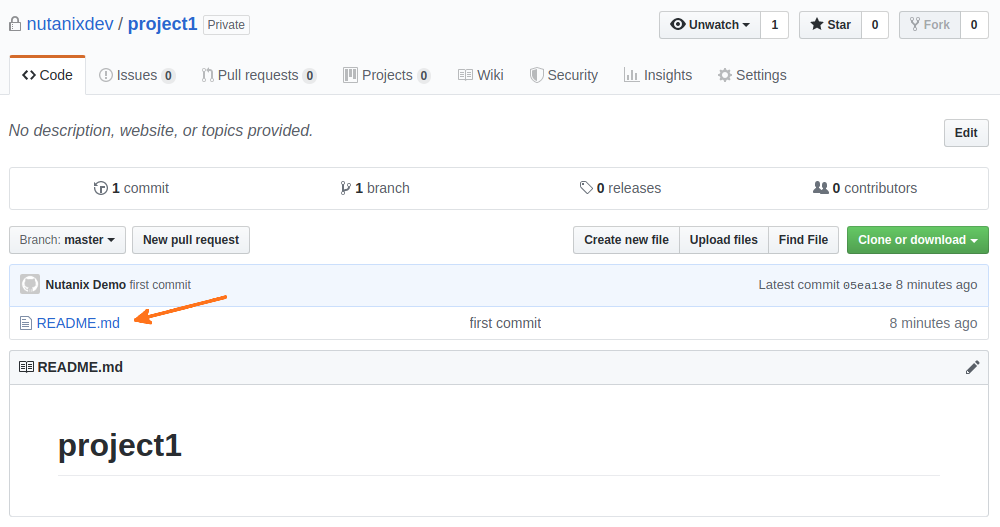
For this example, our project is named “project1”. By checking the option for “Initialize this repository with a README”, selecting a “Git ignore” and License option we’ll see in moment that GitHub Desktop has created various files in our project directory.
The “MIT License” shown in this example is a very commonly-used license as it puts very limited restriction on code reuse. Please see the Wikipedia MIT License page for more info. Additional information on other license types can be viewed on the Wikipedia Software Licenses page.
Note the Open in Visual Studio Code option? If you have completed the Editors section of this lab, you can simply click the Open in Visual Studio Code button and have your project immediately opened and ready for editing in VS Code! If you installed Sublime Text 3 instead of Visual Studio Code, this button will be worded accordingly.
Likewise, the Show in Explorer option is a quick way of jumping straight into the directory structure for your project, ready to manage the files as necessary.
At this point, as indicated by the GitHub Desktop application, the new repository is only available on your local system. It is not available on GitHub.com and cannot be cloned from GitHub onto another development machine.
Note
The Publish repository button, shown below, allows us to publish the repository. However, this will attempt to create a new repository in your GitHub account and, if you have followed this lab to this point, will return an error saying the project1 repository exists. This can be “fixed” by changing the project1 repository name in the GitHub Desktop application, although that means the local and remote repositories will have different names. Please be aware of this when creating local repositories with the same name as existing GitHub repositories.
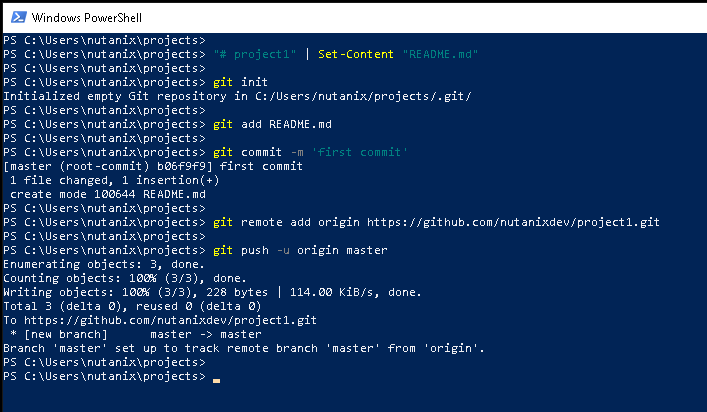
Before getting started, go to GitHub and, if you don’t already have one, create a username for yourself. This will be used in upcoming steps.
Login to GitHub, go to https://github.com/<your_username> and, under the Repositories tab, use the New button to create a repository called project1; this is temporary so you are welcome to delete it later
Whether or not the repository is private is up to you but please note that public repositories can be viewed by ANYONE - don’t store anything secret in them!
Leave the Initialize this repository with a README, .gitignore and Add a license options as default for now
After creating the repository, leave the following page open; you will be copying commands from it in a moment
Install Git from the downloaded .exe executable (the default options during installation are acceptable for this lab)
On your PC/laptop, open Windows PowerShell
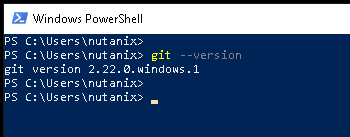
Enter the following command to ensure Git is installed and available in the Windows PATH:
git--version
On Windows systems where the user has opted to use PowerShell, the following example steps should be followed to carry out GitHub operations.
Telling Git your name and email address is important; they are used to identify who makes changes to Git repositories. Set your name and email address by running the following commands, making sure to change “FIRST_NAME LAST_NAME” and “your_name@your_domain.com” to your own name and email address.
In some instances these commands can only be run once. If you receive an error about multiple values during any of the commands above, the –replace-all parameter can be added to override the existing settings. For example:
Now that you have a number of key tools and applications installed, it’s time to look at how API requests can be tested. As with most topics in development, there are many ways to do this. For our setup lab, we will concentrate on what is probably the most popular tool for API testing - Postman.
From the Postman site, please download the installer for your chosen operating system. At the time of writing this lab, the current version is 7.5.0 for Linux, OS X and Windows.
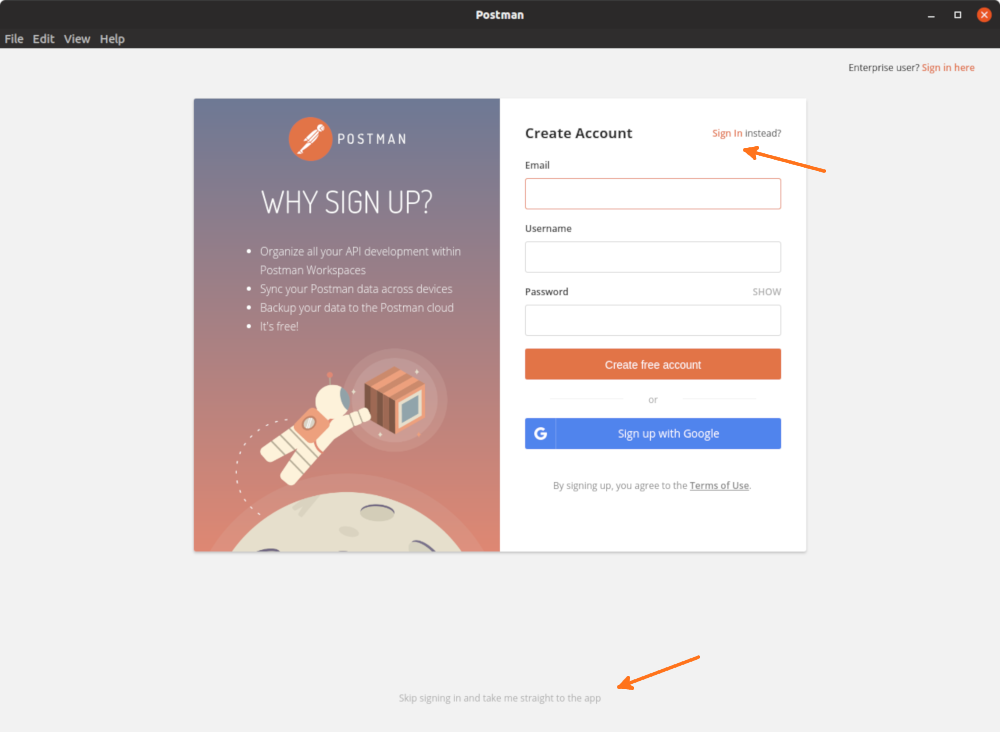
Please now start Postman for the first time. If this is the first time you have started Postman, you’ll be presented with a screen suggesting you create a Postman account. While this is not mandatory for the Nutanix Developer Marketing labs or even for Postman use in general, it can be a useful addition for using Postman on multiple machines.
If you already have a Postman account, please feel free to sign in using the Sign In link provided.
If you prefer to skip signing up and want to use Postman without an account, please click the Skip signing up and take me straight to the app link.
Note
The screenshot actions shown through this lab section will function the same way, logged in or not. Also, the screenshots shown were taken with Postman set to the ‘Dark’ theme. The theme can be changed by clicking the settings “spanner” icon and choosing dark from the Themes tab.
Although we could create an API request immediately, this lab is aimed at getting ready for upcoming labs and articles. For now, take note of the highlighted Request link, but please don’t click it, yet.
Instead, click the X button to close the currently open window.
The screenshot below highlights key areas that we’ll use in upcoming labs. These are the most important areas to be familiar with, although Postman has an enormous amount of functionality outside of “just” API requests.
From 1 to 8, the highlighted sections are as follows.
Each tab is contained within a request tab. This makes it easy to organise each request and its properties for later use.
The + button is how we’ll create new requests. The … ellipsis button can be used duplicate the current tab, re-open recently closed tabs (and more).
Showing GET right now, this is where we can change the request type. For example, common requests types are GET, POST, PUT and DELETE
The URL for the request. For example, Nutanix REST API requests typically start with something like this: https://<ip_address_or_fqdn>:9440/api/nutanix/<api_version_or_name>/<entity>
The Authorization tab is where we can enter the username and password for our requests. When working with the Nutanix RESTS APIs, all requests are sent with Basic Authentication i.e. a username and password combination.
The Body is where we can setup request “payload”. A request payload will typically contain parameters or additional information that a specific API request requires. An example could be the same of the new VM you are creating via API.
The Send button does exactly what the name suggests. It takes all previously-configured settings and sends the request to the desired IP address or DNS name.
Lastly, the large response field is where the JSON-formatted API response will be shown. Using the response field, we can see if the response was successful, if it failed, why it failed or, if everything went well, what the response itself contains.
With this section complete you now have Postman installed and ready to use! The next section will cover some extra tools and utilities that can be useful when working with APIs.
In addition to what we have covered so far, there are many other tools that are useful for different types of development and scripting.
These tools can aid in the inspection and management of code-related activities, although the usefulness of each will very much depend on the size of your environment and your own specific requirements.
For the Nutanix Developer labs, these are all considered optional, but are still recommended nonetheless.
The Optional Tools section, covering multiple operating systems, can be found in the Extras - Optional section.
Thanks for taking the time to complete this lab - we hoped it was fun and educational.
An important consideration is there’s no correct way setup every development environment, especially in terms of directory structures, editor and customisations.
However, if you have come this far, you now have a usable environment to get started with the Nutanix Developer labs.
We also have a growing collection of labs that demonstrate other helpful developer-centric concepts. Please see the Nutanix Developer Portal Labs page for more info.
For further information on this and other technologies interesting to developers, please see Nutanix Developer Portal. There will you find code samples, documentation and a regularly updated blog covering differnt Nutanix technologies.