
")
A recent question from a Nutanix customer kicked off a conversation topic that Nutanix.dev hasn’t yet covered – automating Nutanix Objects bucket-related actions via SDK. If you’re new to Nutanix Objects, let’s take a quick look at how Objects is described on the Nutanix Objects product page:
Forget point solutions, silos, and complexity. Add simple, flexible, S3-compatible object storage to your hybrid cloud to massive scale object storage with ease.
https://www.nutanix.com/products/objects
Like many Nutanix products, various aspects of Nutanix Objects can be automated, allowing many common Objects operations to be attached to other external actions:
- Scripts
- Apps
- Events
- Any other action that may need to complete a set of tasks
This article will look at some of the available resources as well as a few examples of what we can do to automate Nutanix Objects. Specifically, these examples will shown using Python 3 and the boto3 Python module.
Please also note that this article focuses specifically on “Buckets” related actions vs “Objects” related actions. Objects actions, which will be covered in a later article, includes creating and scaling object stores, user quotas etc.
Disclaimer: Please be aware the code samples shown here are provided for demonstration use only and are not supported by Nutanix. Extensive modifications that are outside the scope of this article will be required before using these scripts in any live environment.
Before We Start
While many Nutanix products have publicly available API documentation, a complete Nutanix Objects API reference is not yet available on Nutanix.dev. Please note, however, that Nutanix.dev will be updated to reflect all new Objects API information as soon as it is approved and generally available.
It is also necessary to thank Anirudha Sonar, Senior Staff Engineer at Nutanix. Much of the information in this article was originally created by Anirudha and reproduced here as an additional resource.
Requirements
As with most API operations, a few pieces of basic information are required before getting started. For this demo:
- Objects must be enabled and at least one Object Store configured. For more information, please see “Enabling Objects“.
- We need the Objects endpoint. Our demo environment’s Objects endpoint is
10.42.250.18and is one of the IP addresses assigned as the “Objects Public IP” during object store creation. For more information, please see “Creating or Deploying An Object Store (Prism Central)“. - Credentials for accessing the Object endpoint. For more information, please see “Generating Access Keys for API Users“
Please also note this demo uses a cluster configured with a self-signed SSL certificate. Throughout this article you will see SSL verification being disabled; before using these examples, please consider the security implications of bypassing SSL certificate verification in your environment.
Demo 1: File Upload
The original article, written by Anirudha, can be found here.
With our environment details available, we can look at one of our demo scripts. This script will:
- Connect to Nutanix Objects via the
boto3Python module - Check for bucket existence
- Create the requested bucket, if it does not already exist
- Check if the file already exists, based on the value of
configuration["key"](i.e. a unique identifier for this file) - If the a matching object with the specified key does not exist, upload the file specified by the value of
configuration["filename"] - Set the uploaded file’s key/identifier to the value of
configuration["key"]
Upload File Script
Below is the script that carries out these actions. This version is slightly modified from the original script written by Anirudha. Environment-specific information such as the endpoint URL, access key and secret keys have been removed; please replace these with values appropriate for your environment, if using this script.
import boto3
from botocore.exceptions import ClientError
import sys

session = boto3.session.Session()

# configuration for this connection
# in a "real" script, these values would not be hard-coded
configuration = {
    "endpoint_url": "[endpoint_url_here]",
    "access_key": "[access_key_here]",
    "secret_key": "[secret_key_here]",
    "bucket": "ntnxdev-uploads",
    "filename": "/tmp/hello_world.txt",
    "key": "hello_world.txt"
}

# create our s3c session using the variables above
# note "use_ssl=False", as outlined in the accompanying article
s3c = session.client(
    aws_access_key_id=configuration["access_key"],
    aws_secret_access_key=configuration["secret_key"],
    endpoint_url=configuration["endpoint_url"],
    service_name="s3",
    use_ssl=False,
)

# check if bucket exists
try:
    s3c.head_bucket(Bucket=configuration["bucket"])
    print(f"Bucket exists : {configuration['bucket']}")
except ClientError:
    print(f"Bucket {configuration['bucket']} does not exist.  "
          + "Attempting to create bucket ...")
    try:
        s3c.create_bucket(Bucket=configuration['bucket'])
    except Exception as err:
        print("An exception occurred while creating the "
              + f"{configuration['bucket']} bucket.  "
              + f"Details: {err}")
        sys.exit()

try:
    # create file handle and upload the file to Objects endpoint.
    print(f"Uploading file {configuration['filename']}, as object "
          + "{configuration['key']} in bucket {configuration['bucket']} ...")
    s3c.put_object(Bucket=configuration["bucket"],
                   Key=configuration["key"],
                   Body=configuration["filename"])

    # verify if file is uploaded
    print(f"Checking if {configuration['key']} exists ...")
    response = s3c.head_object(Bucket=configuration["bucket"],
                               Key=configuration["key"])
    print(f"Head Object Response : {response}")
except s3c.exceptions.NoSuchBucket:
    print(f"The {configuration['bucket']} bucket does not exist.  "
          + "Aborting ...")
except Exception as err:
    print("An unexpected exception occurred while attempting "
          + "file upload.  Details:")
    print(f"{err}")
Example Output
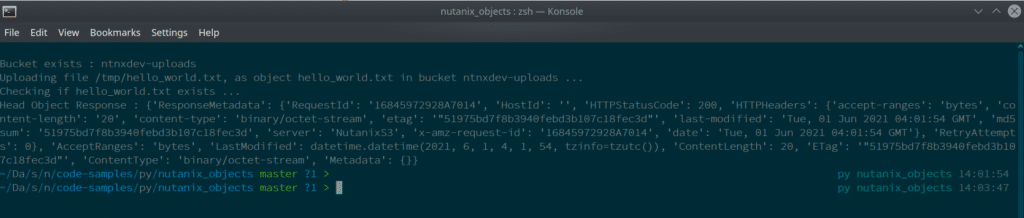
Below is an example of the upload file script being run:
Demo 2: Create Multiple Buckets
In the “real” world, it would likely be common that multiple buckets need to be created. From an example scenario perspective, consider these basic points:
- An app that uses object storage for various purposes
- One bucket is required for static files e.g. web assets
- Another bucket is required for uploaded files e.g. form submissions
- Both buckets, for this demo, are configured with the same lifecycle policies
Lifecycle Policy
The lifecycle policy used in this demo is as follows:
lifecycle_policy = {
    "Rules": [
        {
            "Expiration": {"Days": 10},
            "Filter": {"Prefix": "demo"},
            "Status": "Enabled",
            "ID": "ExpiryPolicy-10Days-ObjectPrefix-demo",
        },
        {
            "Expiration": {"Days": 30},
            "Filter": {"Prefix": "object"},
            "Status": "Enabled",
            "ID": "ExpiryPolicy-1Month-ObjectPrefix-object",
        }
    ]
}
Create Multiple Buckets Script
With a slight modification to the script from the file upload demo, we can easily accomplish this with a script as follows.
Note: This script should also catch the ParamValidationError thrown by the boto3 module in the event a lifecycle policy is invalid.
import boto3
from botocore.exceptions import ClientError
from botocore.exceptions import ParamValidationError
import sys

session = boto3.session.Session()

# configuration for this connection
# in a "real" script, these values would not be hard-coded
configuration = {
    "endpoint_url": "[endpoint_url_here]",
    "access_key": "[access_key_here]",
    "secret_key": "[secret_key_here]",
    "buckets": {
        "web-assets",
        "form-submissions"
    }
}

# create our s3c session using the variables above
# note "use_ssl=False", as outlined in the accompanying article
s3c = session.client(
    aws_access_key_id=configuration["access_key"],
    aws_secret_access_key=configuration["secret_key"],
    endpoint_url=configuration["endpoint_url"],
    service_name="s3",
    use_ssl=False,
)

# setup our bucket lifecycle policy
# please use this carefully as these settings will need to be
# altered before use outside this demo environment
lifecycle_policy = {
    "Rules": [
        {
            "Expiration": {"Days": 10},
            "Filter": {"Prefix": "demo"},
            "Status": "Enabled",
            "ID": "ExpiryPolicy-10Days-ObjectPrefix-demo",
        },
        {
            "Expiration": {"Days": 30},
            "Filter": {"Prefix": "object"},
            "Status": "Enabled",
            "ID": "ExpiryPolicy-1Month-ObjectPrefix-object",
        }
    ]
}

# iterate over the bucket list, verify that each one does
# not already exist and, if not, attempt to create it
for bucket in configuration["buckets"]:
    pass

    # check if bucket exists
    try:
        s3c.head_bucket(Bucket=bucket)
        print(f"Bucket exists : {bucket}")
    except ClientError:
        print(f"Bucket {bucket} does not exist.  "
              + "Attempting to create bucket ...")
        try:
            s3c.create_bucket(Bucket=bucket)
        except Exception as err:
            print("An exception occurred while creating the "
                  + f"{bucket} bucket.  "
                  + f"Details: {err}")
            sys.exit()

    # bucket either already exists or we were able to create it
    # now apply the lifecycle policy
    try:
        print(f"Applying lifecycle policy to {bucket} bucket ...")
        s3c.put_bucket_lifecycle_configuration(Bucket=bucket,
                                               LifecycleConfiguration=lifecycle_policy)
    except s3c.exceptions.NoSuchBucket:
        print("Bucket does not exist.")
    except ParamValidationError as err:
        print("The provided lifecycle policy is invalid.  Please check "
              + "your policy configuration.  Details:")
        print(f"{err}")
    except Exception as err:
        print(err)
Example Output
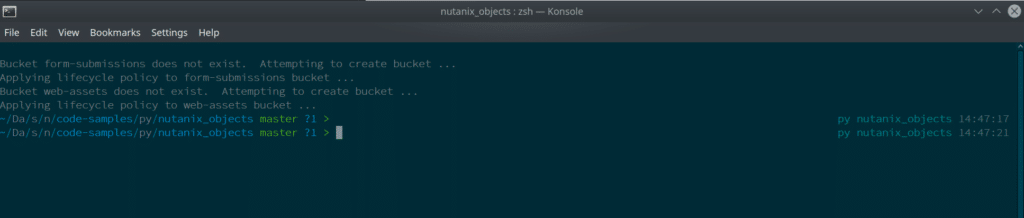
Below is an example of the create multiple buckets script being run:
Additional Resources
Now that we have a good idea of the basics, please be aware of these additional resources:
- Enabling WORM mode using the
boto3Python SDK by Anirudha - List of Supported and Unsupported S3 APIs on the Nutanix Support portal
The examples outlined above are also available as stand-alone resources:
- Nutanix Objects Python code samples
- Upload File code sample (above) on Nutanix.dev
- Create Multiple Buckets code sample (above) on Nutanix.dev
Wrapping Up
Hopefully this introduction to automating Nutanix Objects operations via the boto3 Python SDK has been useful and informative.
Thanks for reading and have a great day. 🙂