Written by Michael Haigh, Technical Marketing Engineer at Nutanix
As a developer or administrator, you’re likely aware of the value that Continuous Integration and Continuous Delivery provide your business. But you’re also likely aware of the challenge of configuring your testing and deployment automation, which is critical to a successful CI/CD model. However, Nutanix Calm abstracts much of that complexity, allowing developers to focus on their applications, and administrators to focus on their infrastructure. In this blog post, we’re going to show how to set up a fully automated CI/CD pipeline, utilizing Nutanix Calm, Jenkins, and the Nutanix Calm Jenkins plugin.
In case you’re not aware, this is the fourth installment in this blog series. While the previous posts are not required to follow along, they each build upon one another:
- In the first post we introduced Nutanix Cloud Native, and walked through manually deploying a Cloud Native application built upon Kubernetes, Object Storage, and a Postgres Database.
- In the second post we deployed the exact same application via a Nutanix Calm Blueprint.
- In the third post we dove into the architecture of the same Calm Blueprint.
CI/CD Pipeline Overview
The workflow for the CI/CD pipeline, which will be covered in detail throughout the rest of this blog, is as follows:
- A developer runs git push from their development workstation, which triggers a GitHub Webhook.
- The webhook triggers a build on a Jenkins pipeline, which is composed of three steps:
- Build: Jenkins utilizes the Dockerfile stored in the git repository to build our Oscar Django container image based on our new commit.
- Publish: Jenkins pushes the newly built container to Docker Hub.
- Calm Plugin: Jenkins utilizes the Nutanix Calm plugin to invoke an API call against Calm.
- The API call launches the Calm blueprint we previously covered, resulting in a running application based on the newly published container.
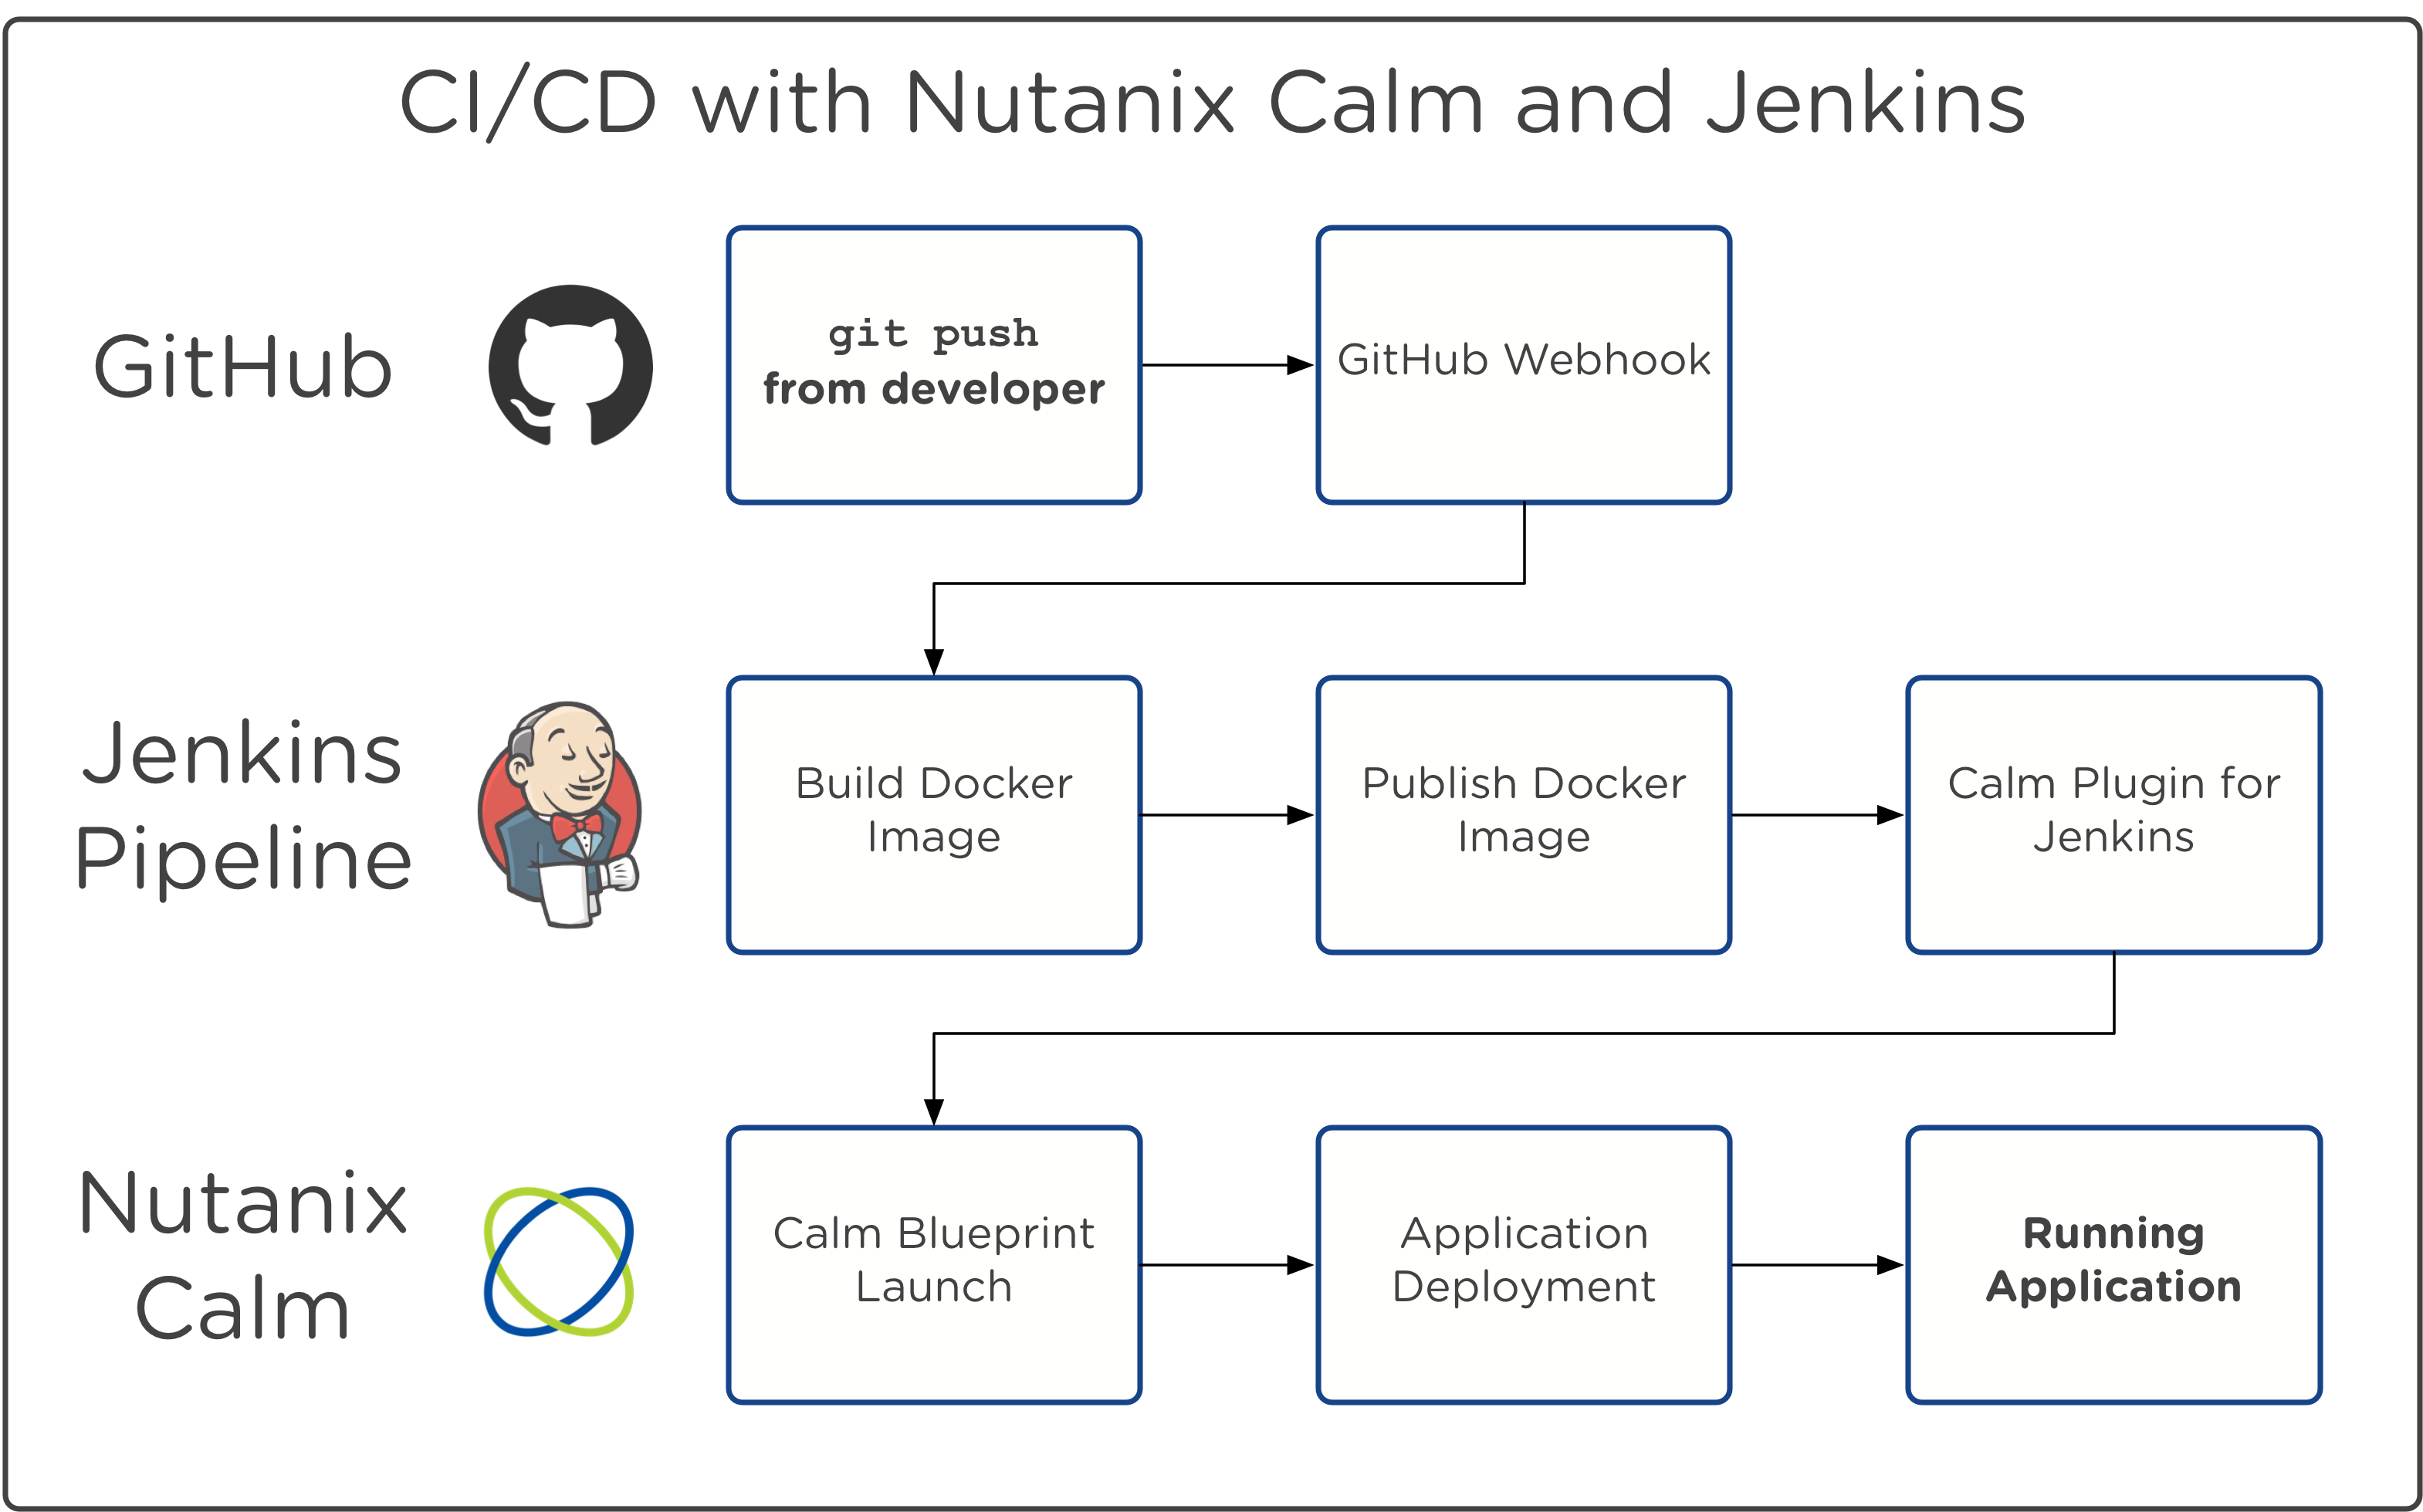
The only manual step is the developer is running git push, and the result is a fully functional, cloud native application. Let’s dive in to the configuration to make this happen.
GitHub Configuration
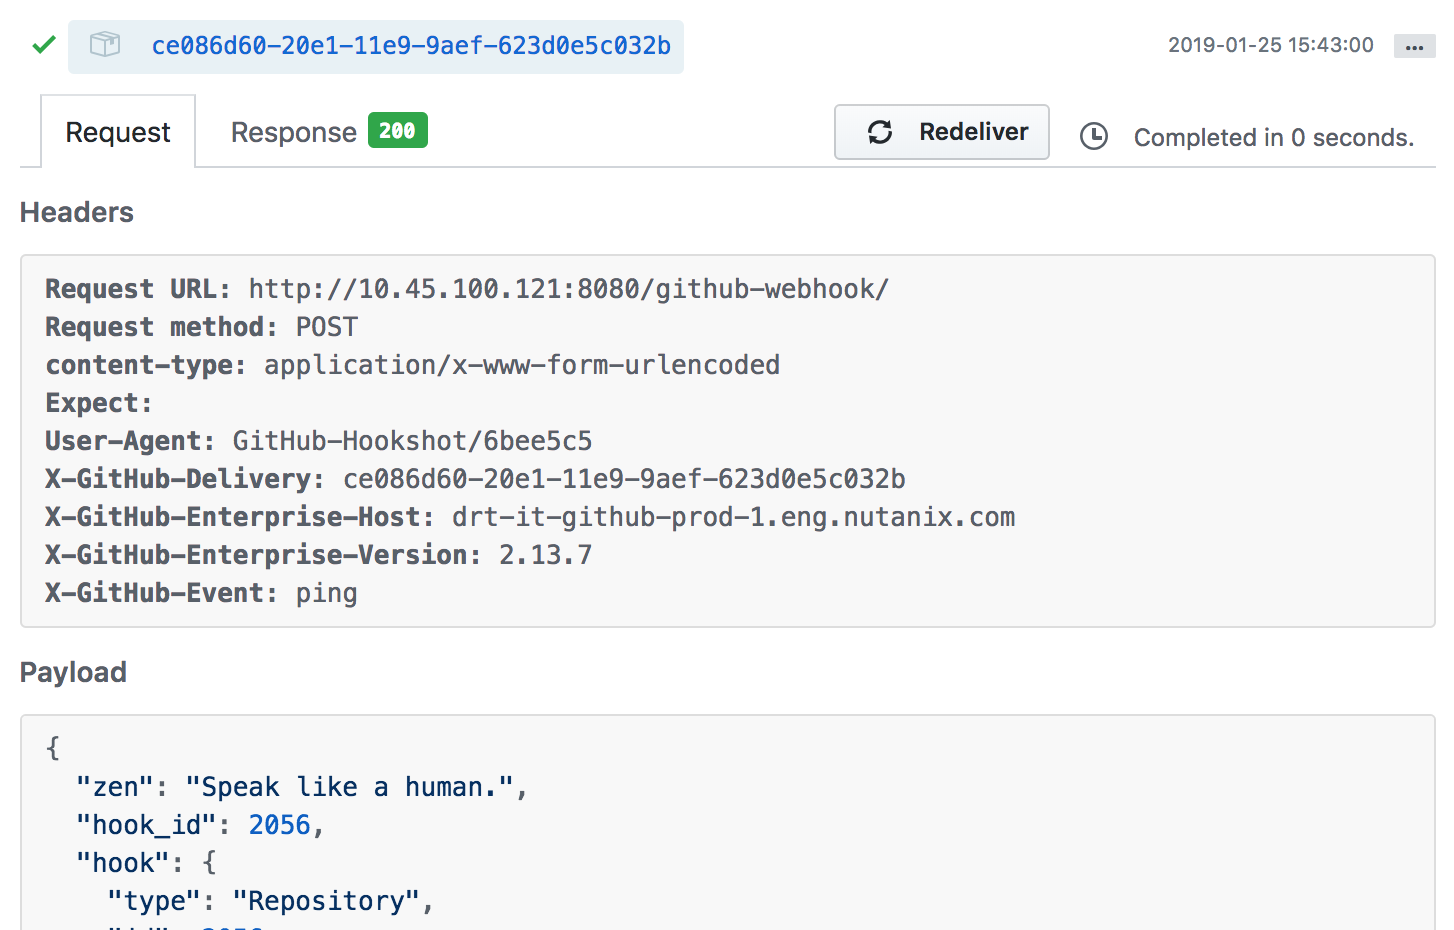
In order for GitHub to communicate with Jenkins, a webhook must be created. This can be done manually under the Settings section of your repository, or Jenkins can automatically handle the webhook configuration, as described in the GitHub plugin documentation.
Regardless of which method you deem best for your environment, verify that the webhook is able to talk to your Jenkins server. Here’s a screenshot of the successful webhook sent by GitHub upon initial configuration.
Jenkins Configuration
There are two main items that need configuration on your Jenkins server: the Nutanix Calm plugin, and your Pipeline. We’ll first go into depth on getting the Nutanix Calm plugin installed and configured, and while Pipeline configuration is largely outside the scope of this blog, we’ll touch on the Pipeline used in our environment.
Nutanix Calm Plugin
To install the Calm plugin, sign in to Jenkins with an administrator account. Navigate to Manage Jenkins and then Manage Plugins, choose the Available column, and search for Calm.

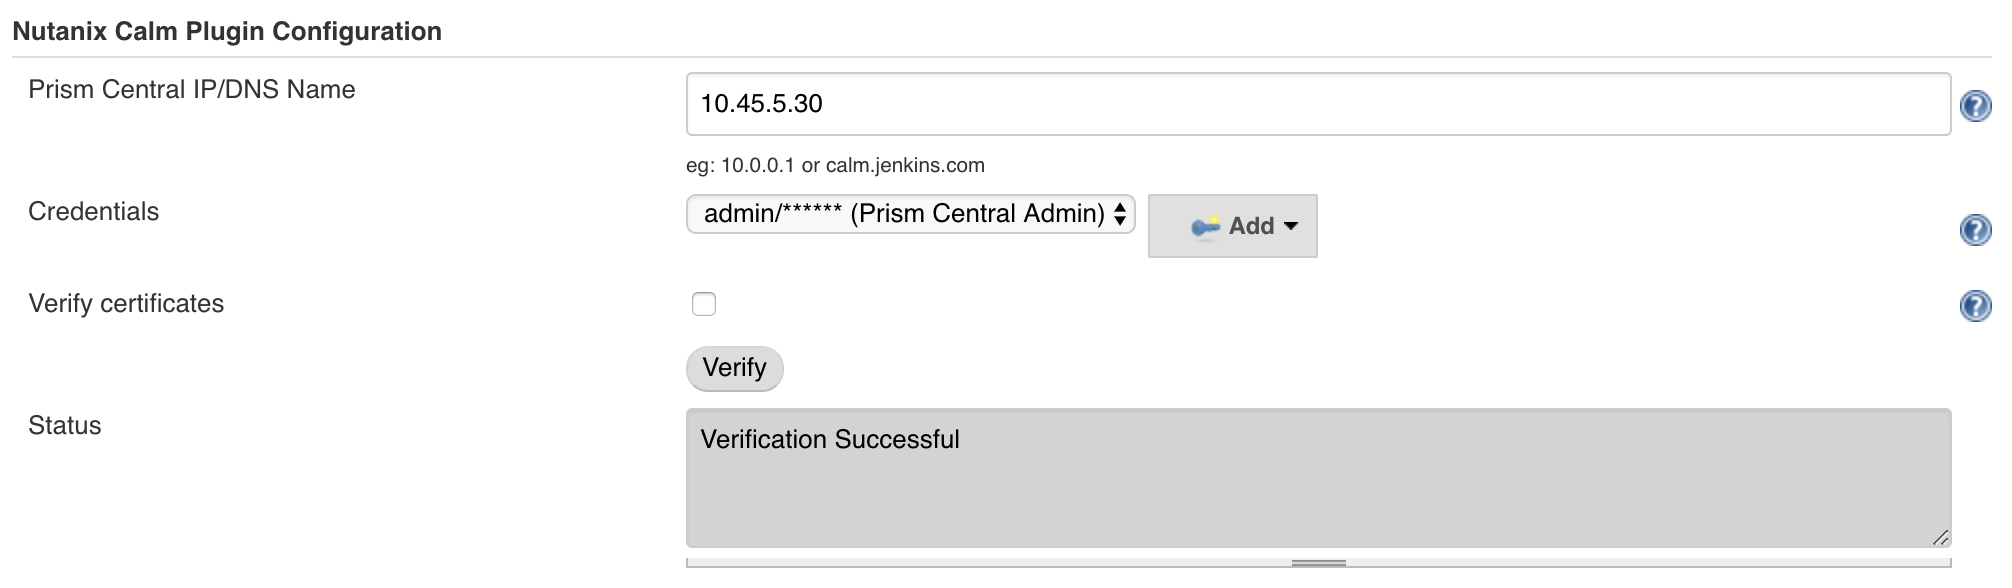
Select the checkbox, and then click Install without restart. Once the Calm plugin has been installed, navigate back to Manage Jenkins and then Configure System. Scroll down to the Nutanix Calm Plugin Configuration section, and fill out the required fields. If you’re unsure about any of the fields, click the question mark icon for more info. For the Credentials section, be sure to add a Prism Central user which has rights to launch a Blueprint.
Once complete, be sure to hit the Verify button. If everything was done correctly you’ll get a verification successful message.
Be sure to hit Save at the bottom of the page before navigating away.
Now that we have the plugin installed, we can generate our Pipeline syntax to be used in our Jenkinsfile. If you’re currently using Jenkins freestyle projects rather than pipelines, please see our Portal documentation for configuration instructions.
Within Jenkins, navigate to your desired Pipeline, and click Pipeline Syntax along the left column. Within the Snippet Generator page that appears, open the Sample Step dropdown, and select step: General Build Step.

If you open the Build Step dropdown that appears, you’ll notice two Nutanix Calm items, Application Action Run, and Blueprint Launch. If you select the Application Action Run, you’ll get the ability to run an Action against an existing application. Imagine our Calm application had a custom action that rolled out the latest containers within our Kubernetes deployment. If we selected this application action, then once we had a successful Jenkins build, our new container image would be rolled out to our existing application. This would be useful in a Production environment, where we only wanted the containers to change, and not the Database or Object Store.
In this example we’re going to select Nutanix Calm Blueprint Launch. This will deploy an entirely new application, which is useful in Dev or QA environments as it can then be subject to extensive testing. In each of the dropdowns that appear, select the fields appropriate for your environment. For the Runtime Variables section, entries are not required if you are content to leave their values as the blueprint default.

Once all the fields are filled out, click the Generate Pipeline Script button. A string will be generated in the text box below the button, which can be added to your Jenkinsfile. This will cause Jenkins to make an API call to Calm to launch the specified blueprint.

Pipeline Configuration
While detailed coverage on Jenkins Pipelines are outside the scope of this blog, there are a couple of required settings if you’re looking to replicate this setup in your own environment. The first is to add your GitHub project URL, and select GitHub hook trigger for GITScm polling. This allows our GitHub webhook to trigger the Jenkins Pipeline build.
The second is to add the snippet string we just generated to our Jenkinsfile. This allows Jenkins to make the necessary API call to launch our Calm blueprint. While not required, I’m storing my Jenkinsfile directly in my Git repository, that way it can be managed by version control. Here’s a copy of my Jenkinsfile for your reference, but be aware that yours may look quite different, especially if you’re using a Declarative Pipeline.
node("docker") {
    docker.withRegistry('', 'bef9483a-47b8-4096-9bce-bc0cdd198b9a') {

        git url: "https://drt-it-github-prod-1.eng.nutanix.com/michael-haigh/NutanixCloudNative-Oscar/", credentialsId: 'd8500ae9-87ba-4fdc-bf16-2535b0a51011'

        sh "git rev-parse HEAD > .git/commit-id"
        def commit_id = readFile('.git/commit-id').trim()
        println commit_id

        stage "Build"
        def oscarApp = docker.build "michaelatnutanix/oscar_jet"

        stage "Publish"
        oscarApp.push 'latest'
        oscarApp.push "${commit_id}"

        stage "App Deployment"
        step([$class: 'BlueprintLaunch', appProfileName: 'Default', applicationName: 'NCN_${BUILD_ID}', blueprintDescription: 'Description is empty', blueprintName: 'NutanixCloudNativeWithDatabaseProvisioning', projectName: 'Demo', runtimeVariables: '{}', waitForSuccessFulLaunch: true])
    }
}
The first two lines ensure a node with docker installed will perform the build, and specify my Docker Hub credentials. Next, we’re defining our GitHub repository, and getting the most recent commit ID. Finally, we’re performing the three steps captured in the image headlining this post: building the docker image, publishing the docker image to Docker Hub, and deploying our application via Nutanix Calm.
Triggering the Build
Let’s put all of these pieces together and test our CI/CD pipeline. From my developer workstation, I updated some code in my repository, committed, and then pushed the commit.
[michael@haigh NutanixCloudNative-Oscar]$ git push
Counting objects: 7, done.
Delta compression using up to 4 threads.
Compressing objects: 100% (4/4), done.
Writing objects: 100% (4/4), 380 bytes, done.
Total 4 (delta 3), reused 0 (delta 0)
remote: Resolving deltas: 100% (3/3), completed with 3 local objects.
To git@drt-it-github-prod-1.eng.nutanix.com:michael-haigh/NutanixCloudNative-Oscar.git
   1a23b08..02274ee master -> master
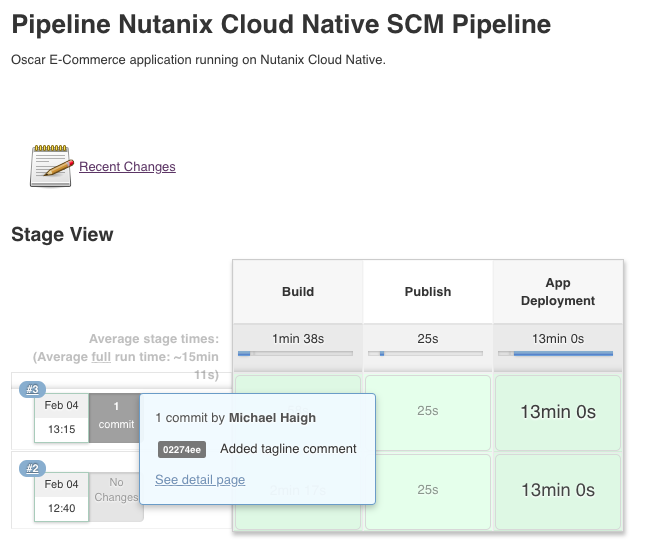
On my Jenkins server, I see a Build get triggered, with a matching commit ID. After 15 minutes the entire build process is complete.
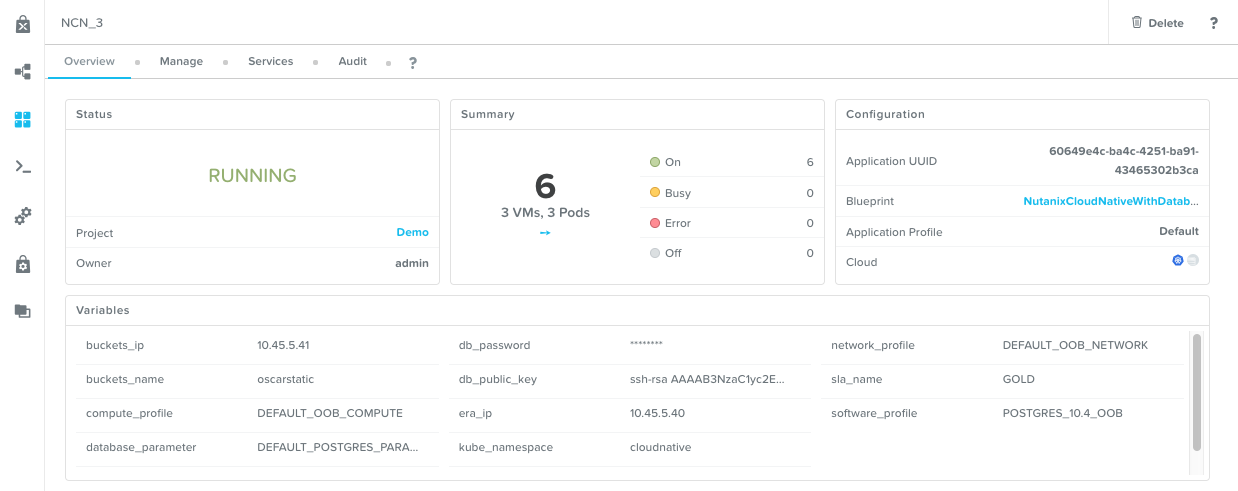
In Nutanix Calm, I see the application has successfully deployed, and is in a Running state.
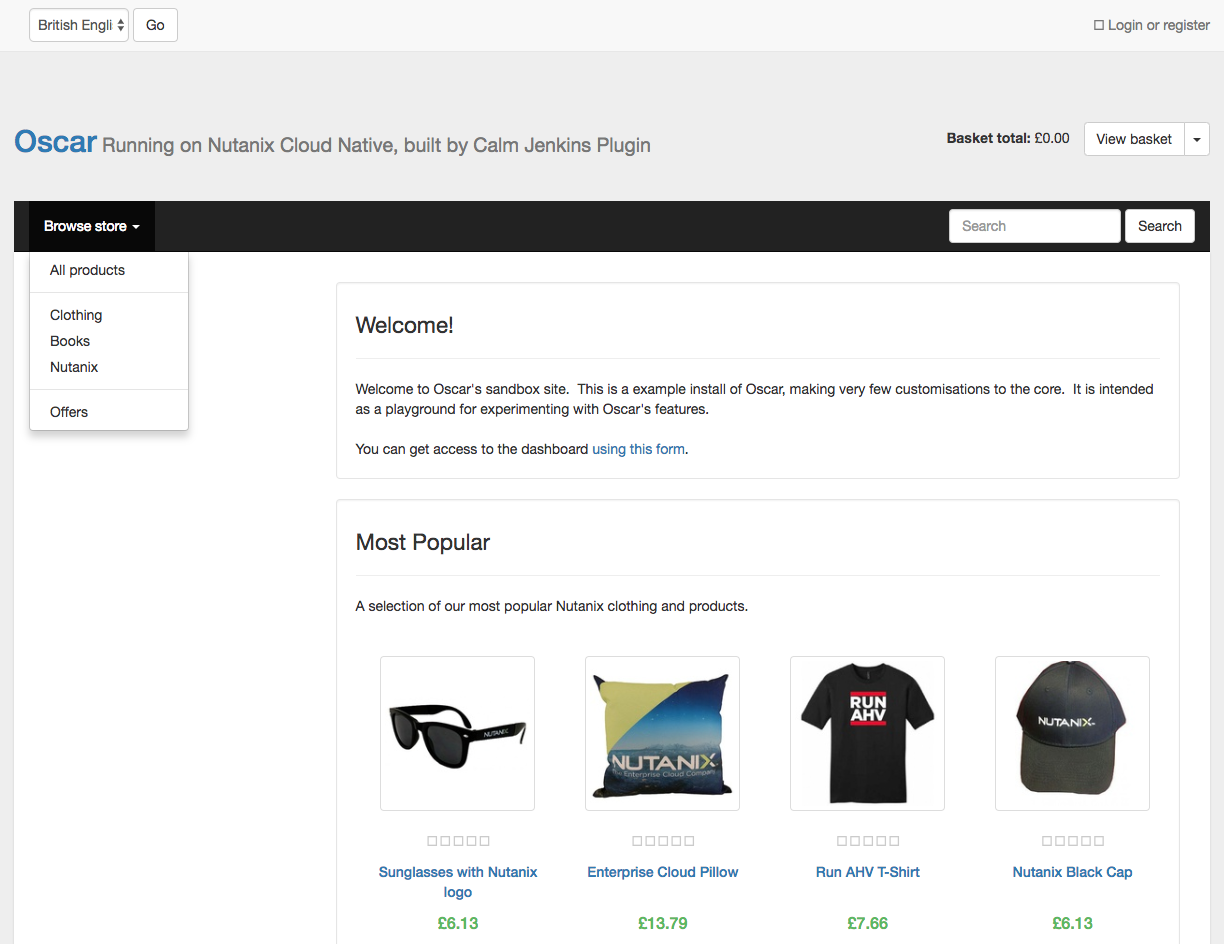
Finally, I can access the application itself, and view the updated shop tagline. All of this was done in a fully automated fashion, with the only manual step being a git push. Now a developer doesn’t have to wait days or even weeks on operations to get a testing environment built, but can instead have it up and running in 15 minutes!